I’m relatively new to shooting photographs with an ND filter to manipulate shutter speed and I’m enjoying this time of discovery and learning. Safe to say the experience so far is something I think I’m really going to explore more of.
In the past, I have tried a few shots of light trails and managed to achieve some of the effects of slow shutters using multiple exposures. That was a fun experience and I think those shots are pretty cool.
A couple of months ago I posted the following BTS photo on Instagram of a picture I was taking using a new 3 stop ND filter I got with my new XF-35mm. Now, this isn’t a fancy lens or filter but it allowed me to try out the technique and allow me to see if I want to keep trying it out.
It was one of the first pictures that I had ever attempted with an ND filter and I was feeling very pleased with it.
After getting home and finally post-processing the above image, I knew that I had done OK for a first attempt. After all, I have ever used an ND filter to create a long exposure shot.
For those of you that don’t know what an ND filter is it effectively is sunglasses for your camera lens. They come in different shades of darkness that cut out more and more light. Each stop will
Why use long exposure photography?
Long exposure photography is when you to slow the shutter speed to such an extent that you are able to get your shutter open for a long period of time.
I’m sure you’ve seen pictures that use this technique somewhere online.
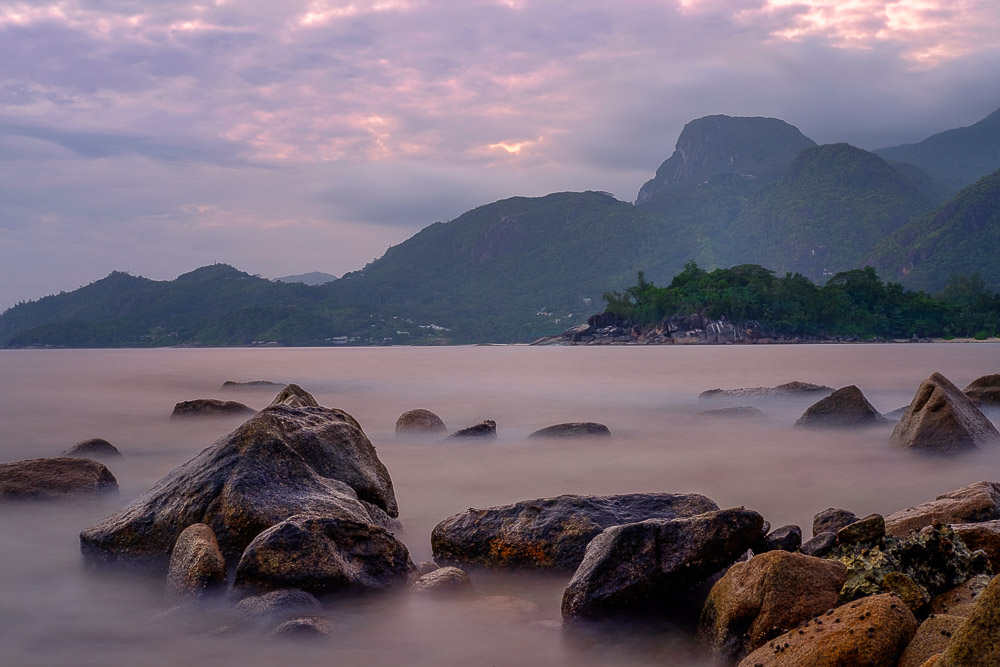
In landscape photography, this is a widely used technique, especially when there are water or clouds in the frame. Because the shutter is open, both of these elements will usually be seen as flowing elements in what is otherwise a very static image.
Let’s take the photo on this post as an example. I’m sitting on some rocks looking out over Barbaros Beach in the Seychelles. The tide is coming in and by using an ND filter, I’ve been able to smooth out the effect of the water moving and create a slow motion moment in time.
The waves and the tide are actually quite strong and in a few moments, I won’t be able to stand where I’m taking this picture from. However, due to the long exposure time, the water has been blurred out creating a beautiful soft landscape.
What I Learned Using an ND Filter
It is not easy to shoot using an ND filter if you’ve not had practice. However, through trial and error, you can achieve the artistic effect you desire.
I must have sat and taken photos for over 30 minutes before I got the shot posted. Even then, I would not say this is the perfect shot. I think there is still a lot to learn to really get the technique down to perfection.
While not perfect, I think a number of the other images that I created using the ND filter in Seychelles did come out pretty cool.

The experience did teach me a few things that I wanted to share with you just in case you want to experiment.
Stability is Essential, Use a Tripod
This might seem like something you have already hear but I can guarantee that without a tripod, this is a tough technique to pull off.
When using a tripod, make sure that your tripod is well situated and that the legs are on stable ground. Ensure that all the screws or latches are secure as well.
When taking the picture above, I made an early mistake and had the legs in the water, which caused a lot of blur as each wave hit the tripod and sent vibrations up the legs.If you don’t have a tripod you can try and create a stable base for your pictures by finding a wall, some stones, or anything that is going to hold your camera steady for the duration of the without
Use a Remote Shutter Release
Using the X-T1 and my Android I have an app that allows me to do this. It’s fantastic!But even easier to use is the delayed shutter that almost all cameras have.
The delayed shutter or timer allows you to set a 2-second or 10-second delay on the shutter. This ensures that after you press the shutter button, there isn’t any movement on the camera that can cause any additional vibrations thus causing blur.

Focus Without the ND Filter Attached
The ND filter on the front of my lens cut out quite a bit of light. Furthermore, shooting at sunset on a gray evening didn’t leave enough ambient light for the camera to focus on.
Therefore, I chose to focus the image without the ND filter attached. I also used the manual focus on the X-T1 and used the peak focusing as a guide to ensure that my composition was in focus.
Therefore, I chose to focus the image without the ND filter attached. I also used the manual focus on the X-T1 and the peak focusing to ensure that my composition was in focus.
Calculating How Long to Expose For
I’ve never really been great at the mathematics of photography and when using an ND filter there is some math required. You will need to calculate your exposure times to get maximum effect from the filter.
Now the math isn’t that difficult. But to make this easier on my first attempts, I used an app on my phone to do the calculations. The app is called Exposure Calculator.
It works by simply dialing in the aperture of your test shot, the shutter speed and then filter that you have. The app then calculates the exposure that you will need.
Now, most of the shots I took that evening barely scraped by the 30-second mark. As you use stronger filters and your exposure time goes above 30-seconds, this is going to be an invaluable tool.